こんにちは、ロジカル・アーツの福島です。
今回Alexaのスキルを「ユーザー定義のプロビジョニング」で作成しました。 その中でAlexa開発環境の設定、Alexaとの会話内容をS3に保存する方法、音声を出力する方法の所で苦戦したので、それらの解決方法を書きたいと思います。
やりたいこと
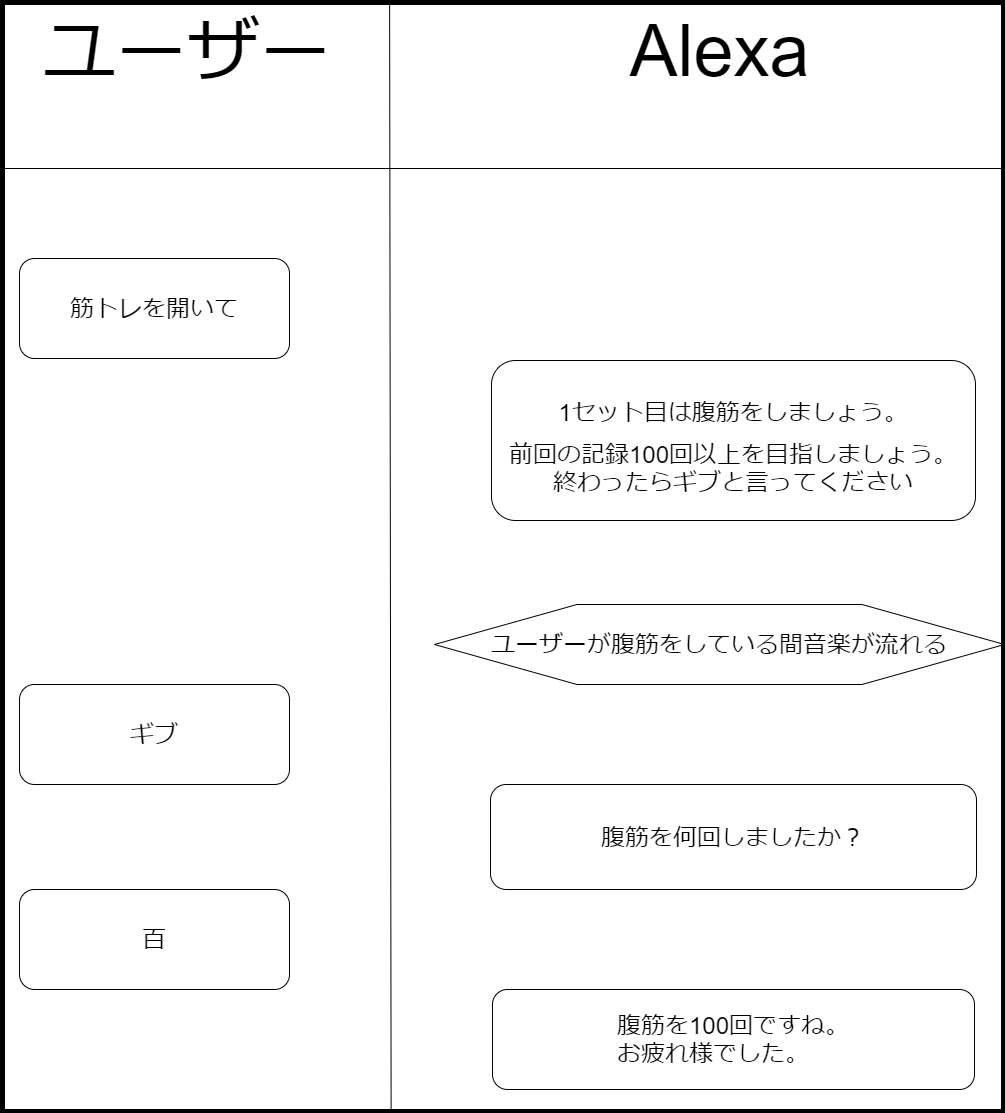 ・一回目のAlexaからの返答に前回の記録を入れる
・ユーザーが筋トレをしている間音楽を流す
事前準備
Alexaを開発するためにはAWSアカウントだけでなく、Alexa開発用アカウントが必要になります。
Alexa開発用アカウントを作成するには、Amazonアカウントが必要になります。
Amazonアカウントの作成
Amazonアカウントがない場合は、こちらから作成してください。
Alexa開発用アカウントの作成
Alexa開発用アカウントがない場合は、こちらから作成してください。
この時、「設定」にも必要事項を記入することを忘れないようにしてください。

Alexa開発に利用するAWSリソースの作成
Lambda
Lambdaのダッシュボードから関数を作成します。
 「Serverless Application Repositoryの参照」、「alexa-skill-kit-nodejs-factskill」を選択します。
alexa-skill-kit-nodejs-factskillには、Alexaをnode.jsで開発するためのテンプレートが入っています。
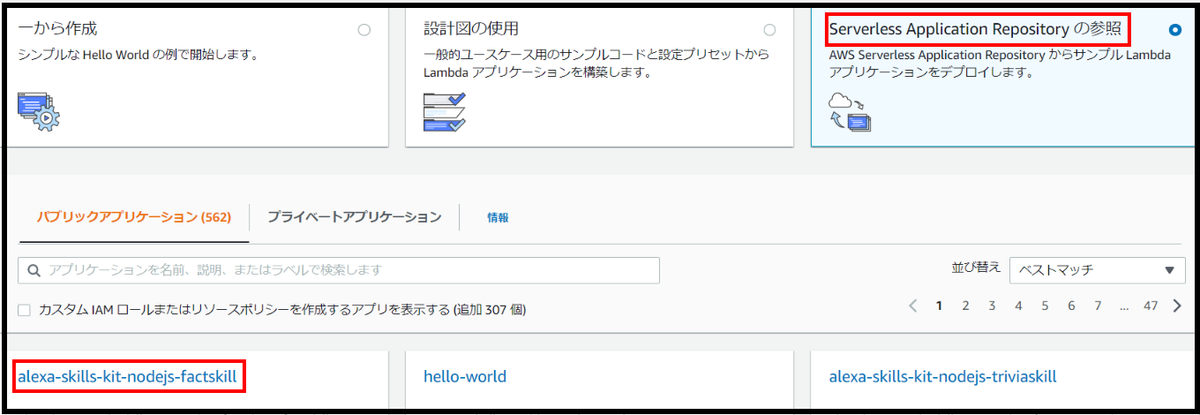 次の画面で「アプリケーション名」に一意となる名前を付けます。
関数ができたら「トリガーを追加」を選択します。
「Alexa Skills Kit」を選択し、スキルIDにはエンドポイントで出てくるものを貼り付けます。
 このLambdaのロールに、「AmazonS3FullAccess」ポリシーをアタッチしておきます。
S3
今回S3には音源の保存、筋トレしたメニュー毎の回数を保存します。
まずこれらを保存するバケットを作成し、音源を保存するためのフォルダの作成をします。今回は「music」に音源を保存していきます。

Alexaスキルの作成
alexa developer console画面へ移動
「Alexa」をクリックします。
 「Alexaスキルの開発を始める」をクリックします。
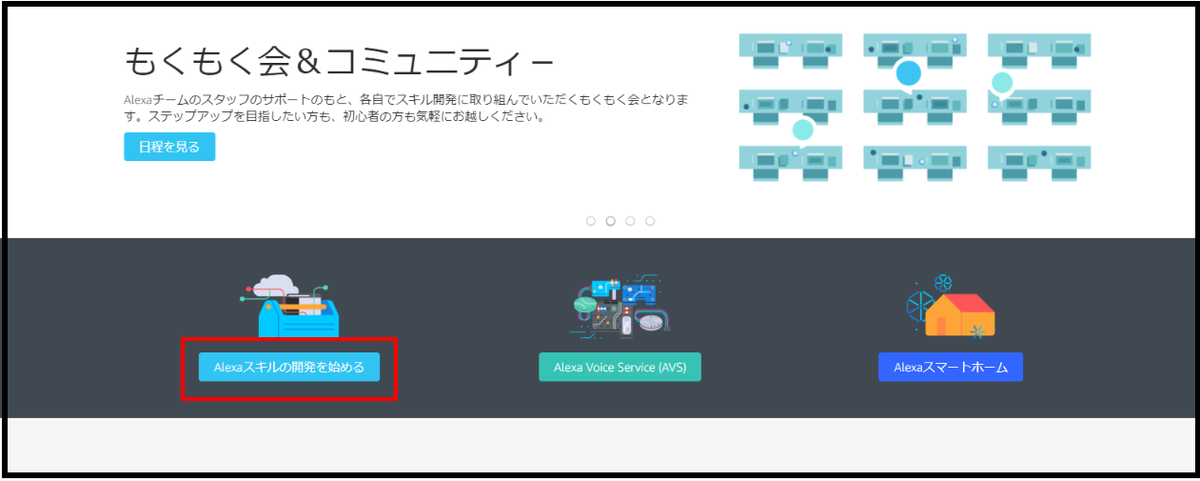 「スキル開発を始める」をクリックします。

Alexaの専門用語について
スキル
Alexaとユーザーがどの様に会話するかの流れを定義したものになります。
呼び出し名
スキルを起動させるワードになります。
「alexa developer console」内で同じ呼び出し名を複数設定していると、先に作成したスキルが呼び出される様になっています。
カスタムインテント
ユーザーがAlexaに言いそうな言葉を1つのグループにしておくことで、グループの中にある言葉を一つでもユーザーが言うと、特定の処理をさせることができます。
ex)1回、2秒、3回
スロット
カスタムインテントの例で挙げた1回、2秒、3回の数字の部分をさらに{num}回という様に、ひとくくりにすることができます。
テスト
alexa developer console画面でアレクサがどの様に動くか実験でき、Lambdaに渡すJsonの確認もできます。
スキルの作成
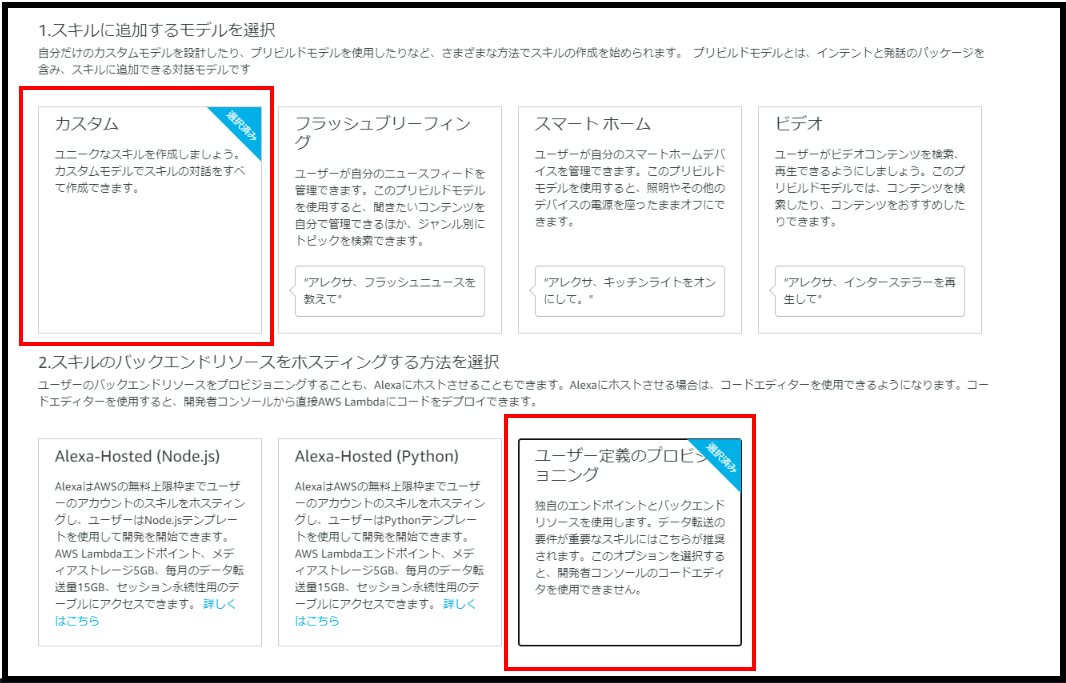
「スキルの作成」をクリックします。
 「カスタム」、「ユーザー定義のプロビジョニング」を選択します。
AWSアカウントがない方は「Alexa-Hosted」を使用してスキルを作れますが、 無料利用枠を超えるとAWSアカウントを作成しないといけないので、最初からAWSアカウントを作成することを推奨します。
スキル開発をするには4つのチェックリストの条件を満たす必要があります。

呼び出し名
「スキルの呼び出し名」を記入し「モデルを保存」をクリックします。

インテント、サンプルスロット
一意となるインテント名をつけます。

スロットタイプ(0)>スロットタイプを選択します。

「数値、日付、時刻」>AMAZON NUMBERの「+スロットタイプを追加」を選択します。
AMAZON NUMBERは今回会話の中で利用する数字を認識するためのスロットです。
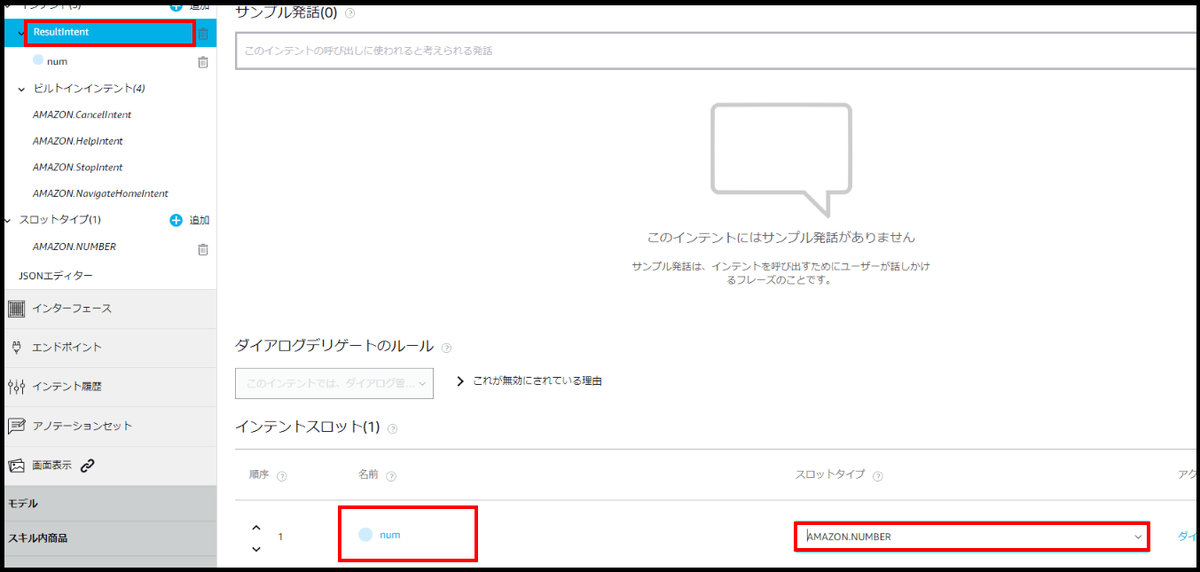
 「ResultIntent」に「num」と記入し「AMAZON NUMBER」を選択します。
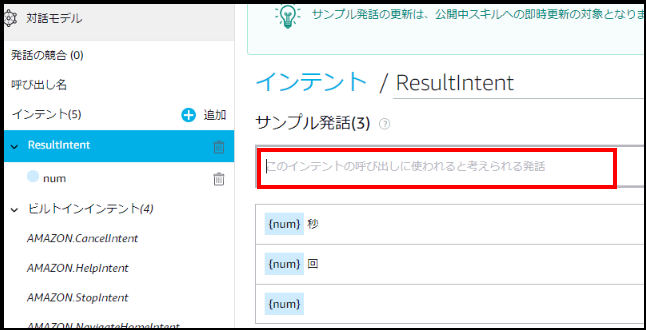
 「サンプル発話」で{num}回、ギブ等、今回の会話の中でユーザーが言いそうな言葉を書きます。
モデルをビルド
画面上部にある「モデルを保存」、「モデルをビルド」をクリックします。
エンドポイント
ここのスキルIDがLambdaを作成するときに必要だったものです。

「デフォルトの地域」に先ほど作成したLambdaのARNを貼り付けます。

コード作成
Lambdaに準備されているコードは不要な部分が多いので、今回はGitHubに掲載されているコードを使います。
完成形
今回作成するコードの完成形は以下内容になります。
const Alexa = require('ask-sdk-core');
const persistenceAdapter = require('ask-sdk-s3-persistence-adapter');


const LaunchRequestHandler = {
    canHandle(handlerInput) {
        return Alexa.getRequestType(handlerInput.requestEnvelope) === 'LaunchRequest';
    },
    async handle(handlerInput) {
      // メニューの選択
      var array = ["スクワット","腹筋","腕立て","背筋","逆立ち","体幹"];
      var menu = array[Math.floor(Math.random() * array.length)];

      // セッションの設定
      const attributes = handlerInput.attributesManager.getSessionAttributes();
      attributes.menu = menu;
      handlerInput.attributesManager.setSessionAttributes(attributes);

        // formatの作成
        let format = {
            "スクワット":{
                "num_past":0,
                "count2_past":"回"
            },
            "腹筋":{
                "num_past":0,
                "count2_past":"回"
            },
            "腕立て":{
                "num_past":0,
                "count2_past":"回"
            },
            "背筋":{
                "num_past":0,
                "count2_past":"回"
            },
            "逆立ち":{
                "num_past":0,
                "count2_past":"秒"
            },
            "体幹":{
                "num_past":0,
                "count2_past":"秒"
            }
        };

      // アトリビュートを読み込むハンドラー
      const attributesManager = handlerInput.attributesManager;
      let s3Attributes = await attributesManager.getPersistentAttributes() ;
      if(s3Attributes[menu] ){
            console.log("trueの場合");
        }else{
            console.log("falseの場合");
            s3Attributes = format;
        }


      // アトリビュートを保存するハンドラー
      attributesManager.setPersistentAttributes(s3Attributes);
      await attributesManager.savePersistentAttributes();

      // 本文
      const speakOutput = `1セット目は${menu}をしましょう。
                            前回の記録${s3Attributes[menu].num_past}${s3Attributes[menu].count2_past}以上を目指しましょう。
                            終わったらギブと言ってください
                            <audio src="https://logical-arts.s3-ap-northeast-1.amazonaws.com/music/new.mp3" />`;
        return handlerInput.responseBuilder
            .speak(speakOutput)
            .reprompt(speakOutput)
            .getResponse();
    }
};

const ResultIntentHandler = {
    canHandle(handlerInput) {
        return Alexa.getRequestType(handlerInput.requestEnvelope) === 'IntentRequest'
            && Alexa.getIntentName(handlerInput.requestEnvelope) === 'ResultIntent';
    },
    async handle(handlerInput) {
      // セッションの設定
      const attributes = handlerInput.attributesManager.getSessionAttributes();

      // アトリビュートを読み込むハンドラー
      const attributesManager = handlerInput.attributesManager;
      const s3Attributes = await attributesManager.getPersistentAttributes();

      // 変数の設定
      const slots = handlerInput.requestEnvelope.request.intent.slots;
      let num = slots.num.value ||undefined;
      let menu = attributes.menu;
      let count = ["回","秒"];
      let count2 ="";

      // 単位の設定
      if(menu === "スクワット"||menu === "腹筋"||menu === "腕立て"||menu === "背筋"){
            count2 = count[0];
            }else{
            count2 = count[1];
            }

      // 本文
      if(num === undefined){
          const speechOutput = `${menu}を何${count2}しましたか?`;
          const reprompt = `${menu}を何${count2}しましたか?`;
          return handlerInput.responseBuilder
              .speak(speechOutput)
              .reprompt(reprompt)
              .getResponse();
      }
      const speakOutput = `${menu}を${num}${count2}ですね。
                              休憩したら2セット目に入りましょう`;

      // アトリビュートを保存するハンドラー
      s3Attributes[menu].num_past = num;
      attributesManager.setPersistentAttributes(s3Attributes);
      await attributesManager.savePersistentAttributes();

      return handlerInput.responseBuilder
          .speak(speakOutput)
          .getResponse();
    }
};

const HelpIntentHandler = {
    canHandle(handlerInput) {
        return Alexa.getRequestType(handlerInput.requestEnvelope) === 'IntentRequest'
            && Alexa.getIntentName(handlerInput.requestEnvelope) === 'AMAZON.HelpIntent';
    },
    handle(handlerInput) {
        const speakOutput = handlerInput.t('HELP_MSG');

        return handlerInput.responseBuilder
            .speak(speakOutput)
            .reprompt(speakOutput)
            .getResponse();
    }
};

const CancelAndStopIntentHandler = {
    canHandle(handlerInput) {
        return Alexa.getRequestType(handlerInput.requestEnvelope) === 'IntentRequest'
            && (Alexa.getIntentName(handlerInput.requestEnvelope) === 'AMAZON.CancelIntent'
                || Alexa.getIntentName(handlerInput.requestEnvelope) === 'AMAZON.StopIntent');
    },
    handle(handlerInput) {
        const speakOutput = handlerInput.t('GOODBYE_MSG');

        return handlerInput.responseBuilder
            .speak(speakOutput)
            .getResponse();
    }
};

const FallbackIntentHandler = {
    canHandle(handlerInput) {
        return Alexa.getRequestType(handlerInput.requestEnvelope) === 'IntentRequest'
            && Alexa.getIntentName(handlerInput.requestEnvelope) === 'AMAZON.FallbackIntent';
    },
    handle(handlerInput) {
        const speakOutput = handlerInput.t('FALLBACK_MSG');

        return handlerInput.responseBuilder
            .speak(speakOutput)
            .reprompt(speakOutput)
            .getResponse();
    }
};

const SessionEndedRequestHandler = {
    canHandle(handlerInput) {
        return Alexa.getRequestType(handlerInput.requestEnvelope) === 'SessionEndedRequest';
    },
    handle(handlerInput) {
        console.log(`~~~~ Session ended: ${JSON.stringify(handlerInput.requestEnvelope)}`);
        // Any cleanup logic goes here.
        return handlerInput.responseBuilder.getResponse(); // notice we send an empty response
    }
};

const IntentReflectorHandler = {
    canHandle(handlerInput) {
        return Alexa.getRequestType(handlerInput.requestEnvelope) === 'IntentRequest';
    },
    handle(handlerInput) {
        const intentName = Alexa.getIntentName(handlerInput.requestEnvelope);
        const speakOutput = handlerInput.t('REFLECTOR_MSG', {intentName: intentName});

        return handlerInput.responseBuilder
            .speak(speakOutput)
            //.reprompt('add a reprompt if you want to keep the session open for the user to respond')
            .getResponse();
    }
};

const ErrorHandler = {
    canHandle() {
        return true;
    },
    handle(handlerInput, error) {
        const speakOutput = handlerInput.t('ERROR_MSG');
        console.log(`~~~~ Error handled: ${JSON.stringify(error)}`);

        return handlerInput.responseBuilder
            .speak(speakOutput)
            .reprompt(speakOutput)
            .getResponse();
    }
};

exports.handler = Alexa.SkillBuilders.custom()
    .addRequestHandlers(
        LaunchRequestHandler,
        ResultIntentHandler,
        HelpIntentHandler,
        CancelAndStopIntentHandler,
        FallbackIntentHandler,
        SessionEndedRequestHandler,
        IntentReflectorHandler)
    .addErrorHandlers(
        ErrorHandler)
    .withPersistenceAdapter(
     new persistenceAdapter.S3PersistenceAdapter({bucketName:"logical-arts"})
     )
    .lambda();
準備
Alexaとの会話内容をS3に保存する方法、音声を出力する方法以外の所を説明していきます。
コードについて
Alexaはユーザーが話したことをJson形式でLambdaに渡し、Lambdaは受け取った内容をnode.jsで処理します。 Handlerの中のcanHandleにはどの様なRequestが呼び出されたのか、handleには呼び出されたRequestに対して処理する内容が書かれています。
本文作成
5行目のLaunchRequestにはユーザーが呼び出し名を言った時に返す内容を書きます。
74行目にAlexa開発画面で作成したResultIntentのHandlerを作成します。
今回canHandleにRequestTypeがIntentRequest、IntentNameがResultIntentの場合handleの処理をするという内容を書いています。
210行目にあるexports.handlerに、ResultIntentHandler を書いて初めて処理してくれるようになります。
ここまでの流れでユーザーがギブというと、ResultIntentに飛ばせるようになったのですが、最初のAlexaの会話ででてきた筋トレのメニューは消えてしまっています。セッションに保存して一連の会話でメニュー内容を何度でも取り出せるように保存します。
15行目でセッションにメニューを保存します。
81行目でResultIntentHandlerでセッションの内容を読み込みます。
90行目でセッションに保存してあるメニューを取り出します。
次の会話の流れはユーザーがAlexaに回数を言ってくれるので、Lambda上でJsonから回数の情報を取り出します。
それらの情報は88、89行目に書いています。
const slots 、numはテストのJSON入力からとってきています。

セッションの永続性
S3PersistenceAdapterを使うことで今回のAlexaとの会話内容を保存することができます。
Alexa技術ドキュメントの手順に従ってコードを書いていきます。
package.jsonの最後に「ask-sdk-s3-persistence-adapter": "^2.0.0」を加えます。
"author": "",
  "license": "ISC",
  "dependencies": {
    "ask-sdk-core": "^2.0.0",
    "ask-sdk-model": "^1.0.0",
    "i18next": "^15.0.5"
    "ask-sdk-s3-persistence-adapter": "^2.0.0"
index.jsに戻り2行目に「const persistenceAdapter = require('ask-sdk-s3-persistence-adapter')」を加えます。
222行目に「withPersistenceAdapter」を加えbucketNameに作成しておいたS3のバケット名を入力します。
47、83行目に「アトリビュートを読み込むハンドラー」を加えます。
58、113行目に「アトリビュートを保存するハンドラー」を加えます。
9、79行目のhandleの前に「async」を加えるのを忘れないようにしましょう。
コードに書き込むのは以上になりますが、s3PersistenceAdapterを使うにはnode_modulesの中に、ask-sdk-s3-persistence-adapterを用意する必要があります。
GitHubからnpmでインストールします。npmのインストール方法が分からない方はこちらを参考にしてください。
次にLambdaのダッシュボードからアクション>関数のエクスポートをします。
GitHubからインストールしたファイルを解凍し、node_modulesの中にあるask-sdk-s3-persistence-adapterだけを、Lambdaからエクスポートしたファイルのnode_modulesの中に入れます。
ファイルを圧縮するのではなくファイル内のnode_modules、index.js、package.jsonを個別で.zip化します。
ファイルを圧縮するとLambdaにアップロードしても動かないので気を付けてください。
MP3ファイルの出力方法
音声を出力するにはMP3ファイルを、Amazonが指定している形式に変換しS3に保存する必要があります。またオブジェクトへのパブリック読み取りアクセスを許可する必要があります。
Alexa技術ドキュメントの手順で音源をffmpegで変換しS3に保存します。ffmpegのインストール方法が分からない方はこちらを参考にしてください。
ffmpeg -i <変換前音源名> -ac 2 -codec:a libmp3lame -b:a 48k -ar 16000 <返還後音源名>
次にS3のアクセス許可を変更します。
作成したS3のバケットのアクセス権限の「ブロックパブリックアクセス」で「パブリックアクセスをすべてブロック」のチェックを外します。
次に「バケットポリシー」に以下内容を記入します。
{
    "Version": "2012-10-17",
    "Statement": [
        {
            "Sid": "AddPerm",
            "Effect": "Allow",
            "Principal": "*",
            "Action": "s3:GetObject",
            "Resource": "arn:aws:s3:::logical-arts/*"
        }
    ]
}
次にffmpegで変換した音源をS3の「music」に保存し、オブジェクトURLを以下に書き込みます。
<audio src="<オブジェクトURL>" />
オブジェクトURLは以下の場所にあります。
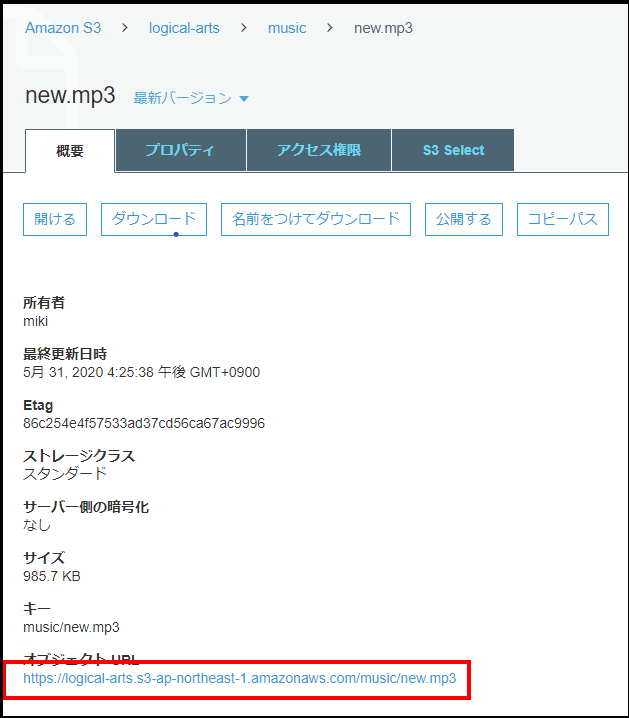 66行目にこのコードを加えます。
まとめ
この記事を通してAlexaスキルの作成の基礎知識はついたかと思います。
Alexaに対して8秒以内に返事をしないとスキルが終了する制限がありますが、この制限をクリアするためにMP3ファイルの出力を使うこともできます。